Building Tips
Whether this is your first dollhouse or you are an old pro, the following building tips might be very helpful!
If you're a beginner, I would have these supplies ready:
Read the directions before starting, make notes, use the schematic sheet to identify parts, and take it one step at a time. Don't be afraid of making mistakes. Everyone does, no matter how long they've been at this. I've been building dollhouses for 40 years and always make mistakes. Figuring out how to correct them is half the fun!
If you're looking for dollhouse building ideas, I found a treasure trove of dollhouse plans in 1930s-40s editions of Popular Mechanics posted online by Google Books. This site has an excellent directory to each plan.http://hisibley.com/?page_id=71
Useful Sites for Builders:
If you're a beginner, I would have these supplies ready:
- Pencil
- Ruler
- Sandpaper (I use coarse Emory Boards)
- Wood filler (only needed if you are building a Greenleaf kit)
- Xacto Knife
- Aileen's Tacky glue (not wood glue or hot glue)
- E6000 glue for metals
- Toothpicks
- Tweezers
- Paper plates (for spreading glue or for paint)
- Cup for water for paint brushes
- Old rags for cleaning (I use old washcloths)
- Paint brushes
- Paint (I use Interior Satin house paint and Americana Acrylic paint and Americana Gel Wood Stain)
- Wallpaper glue (I use Elmers Craft Bond Extra-Strength Glue Stick)
- Miter cutter
- Scissors
- Masking tape
- Dremel Tool (if you plan to make any modifications)
- Small Clamps
- Chopping Board
- Table cloth pad (if you plan to work on a table top that needs protecting)
Read the directions before starting, make notes, use the schematic sheet to identify parts, and take it one step at a time. Don't be afraid of making mistakes. Everyone does, no matter how long they've been at this. I've been building dollhouses for 40 years and always make mistakes. Figuring out how to correct them is half the fun!
If you're looking for dollhouse building ideas, I found a treasure trove of dollhouse plans in 1930s-40s editions of Popular Mechanics posted online by Google Books. This site has an excellent directory to each plan.http://hisibley.com/?page_id=71
- Some kits offer houses in fiberboard or plywood. I've built with both. The fiberboard houses are much heavier, but I've found that if you plan to make any adjustments, such as cutting out a new door, the fiberboard is easier to cut. If the exterior walls are frame boards, the plywood houses come out a bit neater. It's difficult to get all those little pieces of fiber off the side walls before painting the fiberboard walls.
- I buy the cheap vinyl table cloths to cover my table that I am using to build the house. This protects my table, and makes a good flat surface.
- Be sure to use a good glue. Don't use a glue gun as that type of glue doesn't hold up through the years. Even if a kit recommends wood glue, don't use it. It dries yellow (ask me how I know that). This is an excellent source for glue suggestions. http://www.thistothat.com/?fbclid=IwAR070lozJcnzfmK2XG8fZO2xRKSSlyqfUXDYtInkCK-YlZd1OfogHgegRbUI
- I paint and paper as I build. Some do that after the house is constructed, but I've found I cannot get into small places after the pieces are glued together, especially walls beside steps. I use regular wallpaper, not the expensive dollhouse paper. I take a miniature chair with me when I shop for wallpaper to place in front of the pattern to make sure it fits the scale. I also make my own wallpaper by downloading a sample from a home improvement side and reproducing it to fill a sheet. I then print it on cardstock.
- Read the directions several times, identify all pieces and dry fit (tape) the walls together before gluing.
- If your house has siding, be sure the planks are aimed in the right direction before gluing!
- If your house doesn't have a foundation, I would recommend adding one. It really gives the house a nicer look. I cut up yard sticks to make the foundation walls. Sometimes I cut a small window in the foundation and cover it with a little screen (tea strainer).
- I've used regular floor tiles for flooring in some houses. It depends on the period of your house, but they are much cheaper than flooring ($.99 each).
- After I paint trim or dowels, I place the on a few pieces of spaghetti to dry. This keeps them from sticking to the surface.
- Most house kits do not have a flat bottom. I put one under the foundation. It makes the house much sturdier and if you plan to display it on a table, it will be stable, even if the table is a bit smaller than the house.
- Sometimes I display my houses on microwave carts (the kind you assemble youself). Wal-mart sometimes has these fairly cheap, and they come complete with wheels and a shelf for storage.
- I label my wallpapers with code letters: B for bath, BDR for bedroom, etc. When I dry fit the walls together with tape, I can see which wall is part of the bath and which side of the wall is part of the bedroom, so with a pencil, I write those code letters on the walls. That way, when I take the house back them back apart and remove the tape, I will know where to apply each wallpaper before the walls are glued in place permanently. I also make those notes in the directions.
- One thing I wished I had done was to keep all the directions. I threw them all away when I finished the house. I've since started posting directions or links to directions for most of my houses on my website.
- Making a stone foundation: I make the rocks from white Sculpty clay. I formed the rocks on aluminum foil on a cookie sheet, bake them, and paint them while they are still stuck to the aluminum foil. Then I cover the foundation with spackling paste mixed with black paint to form grey. While the spackling was still wet, I put a dab of glue on the bottom of each rock and pressed them into the spackling.
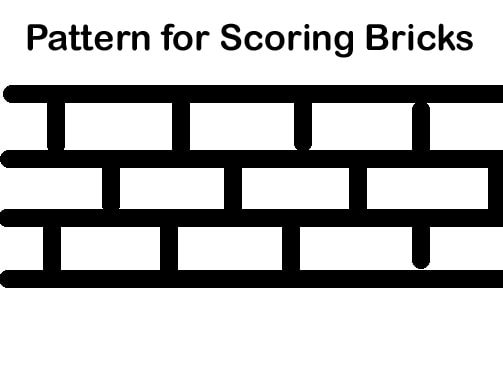
- I use Paperclay for brickwork. Cover the section of the house with a thin layer of glue (Aileen's Tacky Glue is best). Then press the Paperclay into the glue forming a layer that is not too thin. Don't worry about it being smooth, unless you want smooth bricks. If put the clay on too thick it will crack when it dries. That might not be a problem if you want an aged brick look. (You can fill in the cracks with more Paperclay if you do not want them.). While the clay is still wet, use a thin piece of basswood to score the bricks depending on the pattern you choose to use. After it dries, usually in a day or two, paint the mortar area with an Acrylic paint color of your choosing, then paint the bricks using Acrylic wash (paint with a bit of water mixed in). The thinned paint will allow the texture of the clay to show through simulating brick. A brick scoring pattern is shown below
- One more thing...you might consider taking pictures of your house in progess. They make a nice keepsake. I also make a tiny calendar with the year I build the house and place it in every house I build. That way I can keep up with the year the house was built. Some others put the year on the house as a house number.
- When hanging pictures or mirrors in a dollhouse, use wax to get the proper alignment. Then take a photo of the wall with the picture with a camera. It's a great way to make sure the picture is straight (works wne putting up porch railing too.) It you plan to make the picture permanent to the house, add a dab of glue along with the wax. The wax will hold the photo on the wall until the glue dries.
- Flooring and wallpaper can be made on a computer from cardstock. Downloaded a sample of a real floor from a home improvement site. On the computer open the sample in a photo editing program. Resized it and reproduced it until you form a full floor covering sheet. Then print it on cardstock and attach it with an extra strong scrapbook paper glue stick.
- Ever wonder what those tiny keys are for that come with dollhouse doorknobs? I glue a key under a welcome mat beside the front door, or over the door facing.
- Adding a house number is a great touch. Using the date the house was built is a nice way to remember when it was constructed.
Useful Sites for Builders:
- This to That (Glue Resource)
- Making Slate Tiles
- Dollhouse Builders
- Facebook Groups: Miniatures.com and Real Good Toys.com
- Jim Collins' Hobby Calculators
- Mini Workshop
- Real Good Toys Dollhouse Assembly Tips
- More Minis
- The Dollhouse Elora
- Greenleaf Dollhouse Forum
- Real Good Toys, Building A Dollhouse
- This to That helps users find the best type of glue for any project!
- Tracy Topps' Magnificent Houses (Great Inspiration!) Her collection is online as well.
- Joann Swanson's DIY Dollhouse Miniature Blog
- Missing Instructions?
- Laser Dollhouses (1:24) Instructions
- Miter CalculatorW